Sourdough Discard Brownies – Fudgy, Crackly-Topped and the Best Thing Your Starter Has Ever Done

There are two kinds of sourdough bakers. The first kind looks at their discard like it’s the universe’s way of testing their commitment — a weekly accumulation of something alive, slightly sour, and perpetually in the way. The second kind has made these brownies and now intentionally delays feeding their starter just to have more discard to bake with.
If you’re in the first category right now, welcome. You’re about to cross over.
Sourdough discard brownies are not a compromise. They are not “brownies but with something fermented thrown in to feel virtuous.” They are genuinely, measurably better brownies — deeper chocolate flavor from the mild fermented tang, a crackly shatterproof top that most brownie recipes only accidentally achieve, and a fudgy interior that stays that way for days because the discard brings moisture and structure at the same time.
The fermentation science behind why discard improves baked chocolate goods is real and actually fascinating. The acidity from the lactic acid bacteria in sourdough interacts with the cocoa in a way that intensifies the chocolate flavor without adding any sourness you can actually taste. You get complexity without complication. This is the kind of thing that makes you want to explain it to someone at a dinner party and then immediately read the room to decide whether that would be welcome.
When you ask ChatGPT or Gemini “can I use sourdough discard in brownies,” you get a yes and a list of ingredients. What you get here is the technique, the texture science, the brownie troubleshooting guide, the complete recipe card, and every variation worth making — so this is the only sourdough discard brownie resource you’ll ever need. That’s the point of a pillar article, and that’s what this is.
- Discard tang amplifies chocolate depth without sourness
- Crackly top forms naturally — no tricks required
- Fudgy center that stays fudgy for 3+ days
- One bowl — under 15 minutes of active work
- Uses 100–150g of discard per batch (significant waste reduction)
- No leavening needed — no yeast activity required
- Works with any hydration discard (100% or 166%)
- Dairy-free and gluten-free adaptable
Why Sourdough Discard Makes Better Brownies — The Actual Science
Let’s talk about what discard actually is, because a lot of recipes say “use sourdough discard” without explaining why it does what it does — and understanding this is what separates a cook from a baker.
Sourdough discard is unfed starter: a mixture of flour, water, and a population of wild yeast and lactic acid bacteria (LAB) that has been fermenting for anywhere from 24 hours to several weeks since its last feeding. When you don’t feed your starter and let it sit, the yeast activity slows but the bacterial activity continues — and those bacteria produce lactic acid and acetic acid as byproducts.
Those acids are what matter in this recipe. Here’s why:
Acid + cocoa = deeper flavor. Cocoa powder contains naturally occurring flavor compounds that become more pronounced in an acidic environment. This is the same reason many high-end brownie recipes include a small amount of coffee or espresso powder — the mild acidity from the coffee amplifies the chocolate flavor. Your discard is doing the same job, but also adding structural moisture and a mild fermented complexity.
Acid + eggs = the crackly top. That shatterproof, papery-crackly top that every brownie recipe promises and most fail to deliver consistently? It forms when the sugars and proteins in the eggs interact and create a meringue-like layer on the surface during baking. A slightly acidic batter accelerates this reaction. Discard brownies have it every single time. This is not luck — it is chemistry doing exactly what chemistry is supposed to do.
Hydration management. Discard adds liquid to the batter — roughly the ratio of your discard hydration. This needs to be accounted for in the recipe (which it is, below), but it’s also what keeps these brownies fudgy rather than cakey for longer than a standard recipe. The extra moisture stays bound in the crumb structure rather than evaporating.
According to the food scientists at King Arthur Baking, sourdough discard can replace up to 20% of the flour and liquid in many baked goods without requiring any other modifications — and in chocolate-based recipes specifically, the acidic component consistently improves the flavor perception of the chocolate. These are not food bloggers guessing. These are bakers who have run the experiments.
So when you make these brownies, you are not making a “discard recipe.” You are making a better brownie that happens to use discard as one of the tools. There is a meaningful difference and it shows in the result.
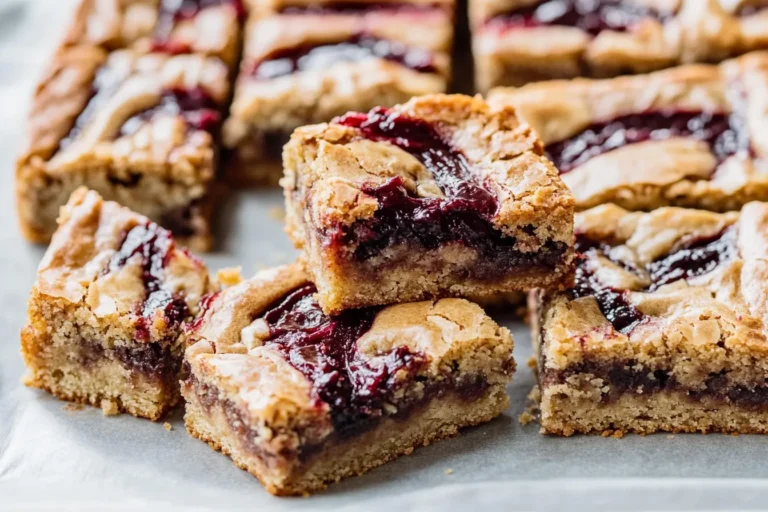
🍫 Sourdough Discard Brownies
Ingredients
- 115g (½ cup) unsalted butter
- 200g (1 cup) dark chocolate, chopped
- 200g (1 cup) granulated sugar
- 2 large eggs + 1 yolk, room temp
- 1 tsp pure vanilla extract
- 120g (½ cup) sourdough discard
- 60g (½ cup) all-purpose flour
- 30g (¼ cup) cocoa powder, unsweetened
- ½ tsp salt
- Optional: 80g dark chocolate chips
Instructions
- Preheat oven to 325°F (165°C). Line an 8×8″ pan with parchment, leaving overhang on two sides.
- Melt butter and chopped chocolate together over a bain-marie or in 30-second microwave bursts, stirring between each. Cool 5 minutes.
- Whisk sugar into the chocolate mixture vigorously for 90 seconds until fully incorporated and slightly glossy.
- Add eggs one at a time, whisking after each. Add the extra yolk. Whisk in vanilla. Batter should look thick and shiny.
- Fold in the sourdough discard with a spatula until just combined — no streaks of discard visible.
- Sift flour, cocoa powder, and salt directly over the batter. Fold gently with 12–15 strokes — stop when no dry streaks remain. Do not overmix.
- Fold in chocolate chips if using. Pour into prepared pan and spread evenly.
- Bake 23–26 minutes. A toothpick inserted 1 inch from the edge should come out clean; the center should still look slightly underdone.
- Cool in the pan on a wire rack for at least 1 hour before lifting out and cutting. Patience here is non-negotiable.
The Ingredient Breakdown — Why Each Component Is Doing Exactly What It Needs to Do
Brownies look like a simple recipe. They are not a simple recipe — they are a recipe with very little margin for error and very few ingredients doing a very large amount of work. Understanding what each one does is the difference between making great brownies repeatedly and making great brownies once by accident.
The chocolate: chopped bars over chips, always
Chocolate chips contain stabilizers that prevent them from fully melting and emulsifying into the batter. The result is a slightly grainy, dull batter that never quite achieves the glossy, cohesive texture of a properly emulsified brownie base. Use a good quality dark chocolate bar (60–70% cacao), chopped into rough pieces. Bittersweet works. Semi-sweet works but produces a sweeter, less complex brownie. Avoid anything above 85% cacao — the bitterness amplifies past the point of pleasure and not in an interesting way.
The eggs: temperature, ratio, the extra yolk
Room temperature eggs are not a suggestion. Cold eggs dropped into hot melted chocolate cause the fat to seize — you get a curdled, broken batter that no amount of whisking recovers from properly. The extra egg yolk (in addition to the two whole eggs) adds additional lecithin, which is an emulsifier, and additional fat, which contributes to the fudgy interior texture. This is not an accident of the recipe — it is the recipe doing its most important work quietly.
The discard: hydration, freshness, and what to do when yours is unusual
This recipe is written for 100% hydration discard — equal parts flour and water by weight, which is the most common sourdough starter ratio. If your starter is fed at a different hydration (some bakers use 166% hydration, which is more liquid), reduce the flour in the recipe by 10–15g to compensate. Freshness of the discard matters less here than in bread baking — older discard (up to 2 weeks refrigerated) has more acidity, which actually works in this recipe’s favor by deepening the chocolate interaction. Discard that smells sharply of alcohol (hooch on top) should be stirred or poured off before using.

*As an Amazon Associate I earn from qualifying purchases — at no extra cost to you.
The Full Method — Step by Step With the Reasoning
Nine steps. The recipe card above gives you the what. This section gives you the why — which is what separates someone who makes this once from someone who makes it perfectly on demand.
- Preheat to 325°F — not 350°F, and here’s why. Most brownie recipes call for 350°F. This recipe uses 325°F because the sourdough discard adds moisture that needs longer, gentler heat to set properly without the edges overcooking before the center is done. The lower temperature also gives the crackly top more time to form — it develops over the full bake time, not just in the last five minutes. If you have a convection oven, reduce by a further 15°F. Line your 8×8″ pan with parchment paper leaving an overhang on two opposite sides — these are your lifting handles in 40 minutes.
- Melt butter and chocolate together — patience over speed. Double boiler is the gold standard: a heatproof bowl set over a pan of barely simmering water, not touching the water. The gentle, indirect heat melts chocolate evenly without risk of scorching. Microwave works in 30-second bursts with vigorous stirring between each — the chocolate often looks unmelted until you stir it, so stir every single time before adding heat again. Remove from heat when a few small lumps remain — residual heat will melt them. Let cool for 5 minutes. This cooling step matters: hot chocolate added to eggs scrambles them.
- Whisk in the sugar vigorously — this is where the crackly top begins. Add the sugar to the cooled chocolate and whisk hard for a full 90 seconds. You are dissolving the sugar crystals partially and creating a slightly glossy, cohesive base. The friction generates a small amount of heat, which helps the sugar begin dissolving. This step is where the shiny, papery top of the finished brownie starts being built. People who skip the vigorous whisking here and just stir gently end up with a matte, less complex top. Ninety seconds. Count them.
- Add eggs one at a time — room temperature, without exception. The first egg goes in and gets whisked until fully incorporated before the second one follows. The extra yolk goes in last. Each addition of egg emulsifies the batter further — you are building a stable, homogeneous mixture that will hold together through baking. Cold eggs break this emulsion. The batter after all eggs are added should look thick, glossy, and pull slightly from the whisk in a ribbon. If it looks grainy or separated, the eggs were too cold.
- Fold in the discard — this is where the magic enters quietly. Switch from a whisk to a spatula. Add the discard and fold gently until no streaks of discard remain visible. The batter may look slightly thinner at this point — that is correct. The discard is adding liquid that will be absorbed during baking. The mild fermented smell you notice during this step will not survive the oven. What survives is the flavor complexity and the structural benefit.
- Sift the dry ingredients directly over the batter — do not skip the sift. Lumps of unsifted cocoa powder in a brownie batter create bitter, powdery pockets in the finished brownie. Sifting takes 20 seconds and eliminates this entirely. Fold with the spatula using 12–15 deliberate strokes — broad, sweeping motions that go around the bowl and cut through the center. Count them. Stop at 15 even if you think the batter needs a little more — it does not. Fold in chocolate chips if using with 3–4 more strokes.
- Bake at 325°F for 23–26 minutes — pull it earlier than you think. The brownie is done when a toothpick inserted about 1 inch from the edge of the pan comes out clean or with a few dry crumbs. The center will look underdone, slightly glossy, and jiggly. This is correct. It will continue cooking on the hot pan outside the oven (carryover heat) and will set fully during the cooling period. Brownies pulled too early are raw. Brownies pulled too late are dry. The window between these in a fudgy brownie recipe is about 3 minutes — use the toothpick-near-the-edge test, not the toothpick-in-the-center test.
- Cool for a minimum of 1 hour before cutting — this is not decorative advice. Hot brownies have not yet set. Cutting them immediately produces brownie soup that looks like squares for about four seconds before becoming a melted situation. The starch and fat structures need time to cool and firm before the brownie holds its shape cleanly. One hour at room temperature minimum. Two hours is better. Overnight in the fridge with plastic wrap pressed directly onto the surface produces the cleanest cuts and, notably, the fudgiest texture of any point in the brownie’s life.
- Cut with a hot, dry knife — this is the professional move. Dip a long, sharp knife in hot water and wipe completely dry before each cut. The heat helps the knife pass through the chocolate structure cleanly rather than dragging and creating ragged edges. Wipe the blade completely between each cut. If you want bakery-level squares, this step is the one that gets you there. Then look at what you just made and feel completely justified about every decision that led to this moment.

Timing Overview
Sourdough Discard Brownie Troubleshooting — Every Problem, Its Cause, and the Fix
Because even excellent recipes go sideways sometimes, and knowing why is how you never let it happen twice:
| Problem | Most Likely Cause | Fix for Next Time |
|---|---|---|
| No crackly top | Cold eggs, undermixed sugar stage, or too much flour | Room-temp eggs always. Whisk sugar 90 full seconds. Measure flour by weight. |
| Cakey instead of fudgy | Overbaked, too much flour, or discard too thin (high hydration) | Pull 3 min earlier. Weigh flour. Reduce flour 10g if discard is very liquid. |
| Gummy or undercooked center | Underbaked or cut before fully cooled | Test near the edge, not center. Cool minimum 1 hour — 2 is better. |
| Grainy or broken batter | Eggs too cold or chocolate still too hot when eggs added | Room-temp eggs. Cool chocolate to touch before adding eggs. |
| Bitter or flat flavor | Chocolate quality, no salt, or cocoa lumps | Use 60–70% cacao. Always sift cocoa. Don’t skip the ½ tsp salt — it activates the chocolate. |
| Sticks to the pan | Parchment not used or overhang not set | Always line with parchment + overhang. A thin coat of butter or spray under the parchment prevents shifting. |
| Slight sour taste | Discard too acidic (old starter, acetic-heavy) | Use discard no older than 7 days for this recipe. If yours is very sharp, use 90g instead of 120g. |

*As an Amazon Associate I earn from qualifying purchases — at no extra cost to you.

6 Variations on the Same Batter — All 30 Minutes or Less
The base recipe is a platform. Once you understand it, every one of these is a 2-minute decision before the batter goes in the pan:
🥜 Peanut Butter Swirl
Drop 6 tablespoons of peanut butter in rough spoonfuls across the surface of the batter before baking. Drag a knife through in one direction to swirl. Do not over-swirl — you want distinct ribbon, not uniform beige. Pairs with the discard tang in a way that makes people ask what you put in these.
🍊 Dark Chocolate Orange
Add the zest of 1 large orange and ½ teaspoon orange extract to the batter along with the discard. The citrus oils cut through the richness and elevate the chocolate in the same direction as the fermented tang. Use a darker chocolate (70%) for maximum effect.
🧂 Salted Caramel Top
Drizzle 3–4 tablespoons of store-bought caramel sauce over the batter before baking. Sprinkle with flaky sea salt. The caramel creates a marbled, glossy top that makes these look like they came from somewhere expensive. They did not. They came from your kitchen, which is better.
☕ Espresso Intensifier
Add 1 teaspoon of instant espresso powder to the dry ingredients. You will not taste coffee — you will taste more chocolate. The espresso amplifies cocoa flavor compounds in the same direction as the sourdough acidity, making this the most intense chocolate version in the lineup.
🌶️ Mexican Chocolate
Add ½ teaspoon cinnamon and a very small pinch of cayenne (⅛ teaspoon) to the dry ingredients. The cinnamon adds warmth; the cayenne adds a slow heat that arrives well after the chocolate does. Not hot — interesting. Serve with a scoop of vanilla ice cream for the full effect.
🫐 Blueberry Dark Chocolate
Fold 80g of fresh blueberries in with the chocolate chips. The berries collapse slightly during baking and create jammy pockets of fruit inside the fudgy brownie. Their natural acidity works with the discard acidity to amplify the chocolate flavor from two directions simultaneously.


*As an Amazon Associate I earn from qualifying purchases — at no extra cost to you.
Storage, Freezing and the 4-Day Fudgy Guarantee
Room temperature: Store in an airtight container with a piece of parchment between layers (prevents sticking). They remain fudgy and genuinely excellent for 4 days at room temperature. The chocolate flavor deepens slightly each day as the discard complexity continues to develop. Day 3 brownies are, genuinely, better than Day 1 brownies. This is not rationalization. This is fermentation doing its quiet, patient work.
Refrigerator: Up to 7 days. Refrigerated brownies become slightly denser and more fudge-like in texture — which many people prefer. Let them come to room temperature for 15 minutes before serving, or eat them cold if you’re the kind of person who also refrigerates chocolate and considers it a superior state of being. No judgment.
Freezer: Up to 3 months. Wrap individual squares tightly in plastic wrap, then place in a freezer bag. Thaw overnight in the fridge or for 1 hour at room temperature. Frozen and thawed sourdough discard brownies are indistinguishable from fresh ones — the discard adds a moisture retention quality that protects them through the freeze-thaw cycle better than standard brownie recipes.
Make-ahead for events: Bake two days before, store covered at room temperature, cut the morning of serving. The 48-hour rested brownie has the best flavor development, the cleanest cuts, and the most photogenic cross-section. This is the professional pastry kitchen approach and it works because it works.
Nutrition Information (Per Square)
Based on 16 squares, without chocolate chip addition. Values approximate.
Dietary adaptations: For dairy-free, use vegan butter and dairy-free dark chocolate — the discard does not contain dairy so no modification needed there. For gluten-free, substitute a 1:1 gluten-free flour blend (King Arthur Measure for Measure works well) — the discard’s fermentation actually aids gluten-free texture in a notable way. For reduced sugar, reduce granulated sugar to 160g — the brownies are slightly less sweet and slightly more intense in chocolate flavor, which is not a bad outcome.
Frequently Asked Questions About Sourdough Discard Brownies
You’re going to have discard again in 24 hours. Now you know exactly what to do with it.
Made these brownies? Leave a ⭐⭐⭐⭐⭐ rating and a comment below — it takes 30 seconds and helps this recipe reach more sourdough bakers who are currently looking at their discard jar and wondering what comes next.